Read Chinese Healing Exercises Online
Authors: Steven Cardoza
Tags: #Taiji, #Qi Gong, #Daoist yoga, #Chinese Healing, #Health, #medicine, #remedy, #energy
Chinese Healing Exercises (23 page)

2. Rearward Resistance.
Interlock your fingers and place your hands at the back of your head, palms cradling the lower part of your skull. Push the back of your skull into your hands as hard as you can without strain
(
Fig 7.8B
).
Feel the muscles at the back of your neck work as you use your hands to resist and hold it in place. Push for about ten seconds, and then relax. Repeat three times.
3. Lateral/Sideways Resistance.
With your head fully upright and facing forward, place your right palm on the right side of your head near your temple. Push the side of your head into your hand as hard as you can without strain
(
Fig 7.8C
).
Feel the muscles at the right side of your neck work as you use your hand to resist and hold it in place. Push for about ten seconds, and then relax. Repeat three times. Then do the same exercise on your left side.
4. Rotational Resistance.
With your head fully upright and facing forward, place your right palm on the right side of your face, with your upper palm near your cheekbone and your lower palm near your jaw. Turn your head into your hand as hard as you can without strain, as though you were trying to look at something at your right side
(
Fig 7.8D
on next page
).
Feel the muscles at the left side of your neck work as you use your hand to resist and hold it in place. This may seem counterintuitive, but the muscles on the left side of your neck are most responsible for it turning to the right. Turn for about ten seconds, and then relax. Repeat three times. Then do the same exercise on your left side.
When you are finished with these resistance exercises, you may want to do a few repetitions of the stretching exercises again to give your neck the sense of loose openness once more. If so, freely select whichever ones appeal to you.


Figures 7.8A and 7.8B (Resistance Exercises)
 Figure 7.8C (Resistance Exercises)
 Figure 7.8D (Resistance Exercises)
Eight
Face, Head, and Sense Organs
The exercises in this chapter focus on the sense organs. Many of these exercises come from what are called either the Seated Eight Brocades or the Seated Twelve Brocades, depending on how many “brocades” are taught in the traditional set. Numbers had a special significance to the ancient Chinese masters, and many contemporary practitioners still adhere to those principles. For our purposes, there's no need to go into those philosophical distinctions except to point out that they exist, as you may encounter them if you explore these practices further along your path.
There is a well-known, very old yet still popular qigong set called the Eight Brocades, or the Eight Golden Brocades, Baduanjin. Some say that the Seated Brocades are derived from that primary set, but while they are sometimes taught together, they are in fact different if complementary practices. The Eight Brocades are a true qigong but the Seated Brocades, while having some direct effect on qi, are not complete qigongs. That doesn't diminish their value in building health. It does makes them easier to learn, and more quickly provides the benefits for which they were designed. They have the additional virtue of being able to be practiced by people who are unable to stand due to injury, illness, or advanced age.
The more obvious benefits include better functioning of the sense organs involvedâan improvement in vision, hearing, sense of smell, and taste. Along with those benefits, there can be a corresponding improvement in digestion and a decrease in acute or chronic nasal congestion, allowing for easier breathing, for example. The less obvious benefits are derived from the connection each sense organ has to a particular internal organ, through their Five Element correspondences, and from the acupuncture points and meridians that are stimulated. With those connections, and because the sense organs are organs of perception, these exercises can stimulate and improve mental functioning.
Here are the sense organs paired with their corresponding internal organs. The first organ given is the Yin organ, followed by that yin organ's yang organ partner in parenthesis. In this case, the Yin organ is the one of primary influence, but the yang organ will also be involved. Note that this is a two-way street. That is, the functional condition of the internal organ can manifest in the sense organ, and the sense organ will also influence the health and functionality of the internal organ.
Eyes:
Liver (Gall Bladder)
Ears:
Kidneys (Urinary Bladder)
Nose:
Lungs (Large Intestine)
Lips and Mouth:
Spleen (Stomach)
Tongue:
Heart (Small Intestine)
Some of these connections might not be readily apparent to someone not trained in Chinese medical concepts. The easiest might be the nose and lung connection, both because the physical, anatomical pathway is clear, and because a cold or flu can begin with nasal congestion and sneezing which if left untreated can progress to lung congestion and cough. As one more easily understood if less immediately obvious example, consider the connection between the liver and the eyes. Alcohol consumption is well known to be challenging to the liver, and when one drinks too much, two of the most common colloquial descriptions include “seeing double” or being “blind drunk.”
In almost all practices designed to influence qi, it's most common to begin from the top of the body and work down when that is practical. Since that's very easy to accommodate in these exercises, we'll follow that principle here.
 Figure 8.1 (Scalp Rake)
1. Scalp Rake
This opens up the main Yang channels on the scalp and head, the Urinary Bladder, Gall Bladder, and Sanjiao (Triple Burner) meridians. All three communicate directly with the ears and eyes. While not directly stimulating the Du (Governing) meridian, which runs along the centerline of the head, it will receive some benefit from incidental stimulation, its proximity to the other meridians, and its connections to those meridians via small collateral vessels. This will activate the brain, enliven all the senses, and prepare you for all the exercises that follow in this section.
Curl the fingers of both hands as though you are making tiger's claws
(
Fig 8.1
).
Keep your fingers firm and close together, and place the tips of them along the front of your hairline (or at the top of your forehead if you are balding). Your little fingers should be touching
(
Fig 8.2
on next page
)
. Keeping your little fingers in contact, rake over the top of your head to the base of the back of your skull. Use firm pressure, and make this movement brisk. Repeat two more times. Then spread your hands a bit so that your little fingers are about two inches apart, so that your lines of stimulation are farther apart, and repeat the raking movement again three times. Finally, move your hands farther apart again, so that your thumbs are in front of your ears. Rake back again three times, with your thumbs arcing just above your ears, and ending with your thumb tips coming to rest at the hollow near the outer edge of the back of your skull.
 Figure 8.2 (Scalp Rake)
2. Temple Massage
Massage can serve many purposes. This one addresses two common ones: relaxing tight or tense muscles and encouraging qi flow. Together, you can improve local blood circulation as a bonus. Many people don't consider that the scalp is covered in muscle. The muscles at
the temples are aptly named the temporalis muscles. The main acupuncture meridian at
that location is the Gall Bladder meridian. In addition to the benefits common to all these exercises, this one is useful in relieving both tension and migraine headaches.
Place the tips of two or three fingers, whichever is most comfortable, at both temples, slightly above and in front of your ears. If you press directly toward your skull, you may feel indentations in the bones there. While those are the most advantageous spots for your fingertips, don't worry if you can't find them; anything in that area will be of benefit.
Start gently at first, but gradually apply more pressure as you make small circles with your fingertips. Use “attractive force”âthat is, don't let your fingers slide over the surface of your skin, but engage the muscles below. Circle your fingertips ten to twelve times forward, and then the same number of times backward. If you're prone to headaches or stress, you may feel the muscles ache under the pressure. That's not dangerous, and is in fact beneficial and necessary to relieve the tension there. Don't use so much pressure that it actually hurts, though. That's never a good idea. You can repeat the cycle of ten to twelve circles in each direction two or three times if you'd like.
Eye Exercises
3. Ten Point Eye Acupressure Massage
People tend to carry a lot of tension in their eyes, from overusing them in our visually oriented work and cultural environment, and possibly from viewing disturbing or overstimulating imagery either out in the world or generated internally. This can easily become generalized to create or increase stress in every aspect of one's life, since the way you look at things, your perception and outlook on the world becomes quite literally viewed through the lens of that tension. All the eye exercises help to reduce eye tension, and when practiced over time, they will reduce your overall level of stress.
The Ten Point Eye Acupressure Massage most obviously benefits the eyes and can help improve all manner of vision problems. As the eyes are the sense organ associated with the Liver, it will also help improve aspects of Liver functions, notably in its emotional correspondences. People who work with their eyes a lot can be more prone to irritability and anger, as well as depression. Those emotions, especially when habitual and when inappropriate to immediate life circumstances, are generated by the Liver when it is not functioning optimally.
This exercise is also part of a regimen of facial rejuvenation, helping to diminish the fine lines and wrinkles that appear around the eyes with age, and reduce the dark circles and “bags” under the eyes that may result from a lack of adequate sleep, among other things. Liver blood, which is best replenished by regular sleep, nourishes the eyes. Eyes that are habitually tired or weak suffer from inadequate liver blood nourishment. Combine this with the other eye exercises in this section for better results, and for the best results, include any of the exercises for the Liver found elsewhere in this book.
To begin with, you must locate the four points around each of the eyes, and then one at the outer corner of the eyes. The four points are indentations found in the bone surrounding the eyes, so you'll have to roll your fingers just inside the eye sockets to feel them. You may feel some tenderness or even slight pain when touching those points, another indicator that you're on the right spot and that there's qi stuck there. As previously noted, most Chinese exercises with an energetic component work from the top of the body first and then moves downward, so even within this individual exercise, we'll start by locating the upper eye points.
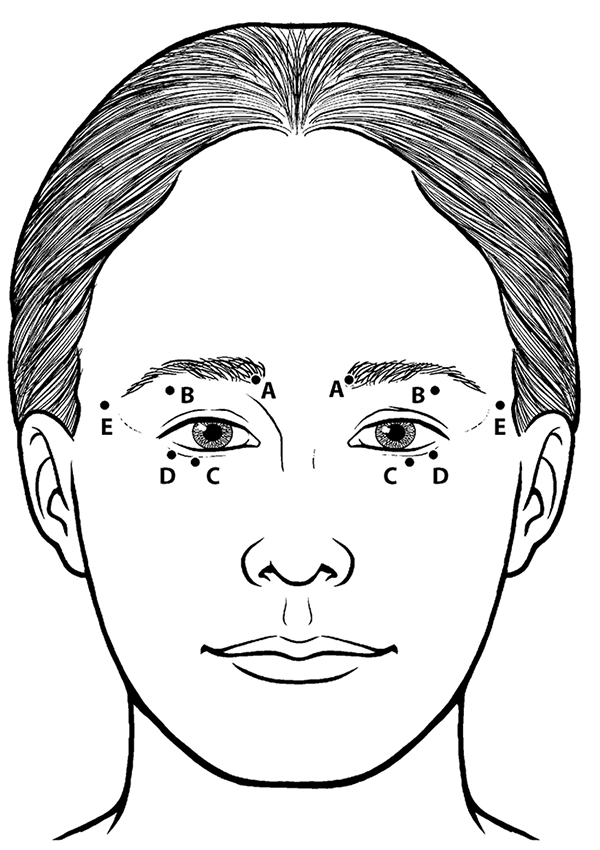 Figure 8.3Aâ8.3E (Ten Point Eye Acupressure Massage)
Place your thumbs at the inner corner of your eyes, touching the bridge of your nose, with thumb pads facing upward. Gently push up, feeling for the ridge of bone at the upper inner border of your eye socket. Move your thumbs slightly outward until you feel a clear indentation or depression in the bone. If you are looking in a mirror when you do this, you'll see your thumbs have not yet reached the centerline of your eye above your pupils, they're still closer to your nose. That's the first point
(
Fig 8.3A
).
To find the second point, slide your thumbs toward the outer corner of your eye, thumb pads still pressing gently upward so you can clearly feel the ridge of your eye socket. As you approach the outer corner of your eyes, you'll feel another indentation, perhaps a half inch before your reach the corner. That's the second point
(
Fig 8.3B
).
The third and fourth points are on the inner edge of the lower border of the eye socket, so now you'll use either your index or middle finger to find them. Below your pupil, curl your fingertip just inside the eye socket. Toward your nose, you may feel a slight pointy bump of bone. Feeling outward from that bump, or just slightly outward from the center of your eye, you'll find another indentation. This one may be smaller than some of the others, but still easy to find when you know where to look. That's the third point
(
Fig 8.3C
).
Sliding your fingers outwards toward the outer corner of your eyes, you'll find the final depression within the eye socket, a finger's width or slightly less from the corner of your eyes
(
Fig 8.3D
).
The fifth, final point is outside your eye socket, just beyond the outer corner of each eye. Place the tips of each index finger at the outer corner of your eyes, and slide them outwards toward the side of your head. Feel them pass over a small bony ridge, and then drop into a depression just beyond that ridge, and just very slightly higher than the corner of the eyes. That's the fifth point
(
Fig 8.3E
).
This is an “extra” acupuncture point, not found on any of the regular or extraordinary meridians, called Taiyang. This is commonly needled to help both with headaches and with eye problems, especially those caused by Wind (the environmental factor associated with the Liver) and Heat. Internal Liver Wind and Liver Heat (Fire) are frequently generated by Liver pathologies, and often cause eye problems that are helped by treating Taiyang.